Tuesday, May 5, 2009

site- Evolution of Photoshop
This is even more on the lifeline of Photoshop... with screenshots of splash screens, tool palettes, workspaces and such.
Feel like I'm in the Wayback Machine!

www.hongkiat.com, here.

Labels: ,

Thursday, April 9, 2009

Contact Sheets in Bridge CS4


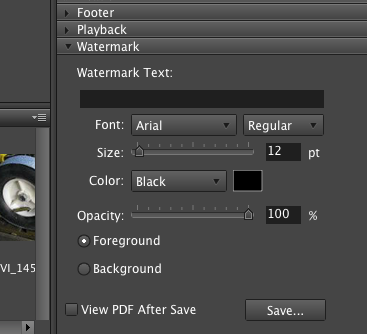
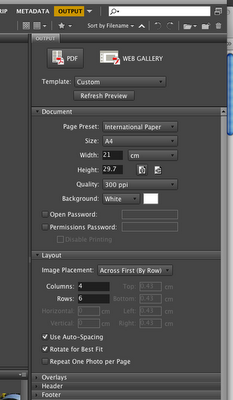
Making Contact Sheets in CS4 has moved from the Photoshop "Automate" menu to the "Output" menu in Bridge. When you select "PDF" you get the usual Contact Sheet decisions- rows, columns, file names, etc, along with new stuff like headers and footers. Refresh the Preview to see the results.


When you have it nice, go to the very bottom. There, hidden in the "Watermark" section is the Save button. Snap. Done.

Labels: , ,

Thursday, February 12, 2009

Functions, names, and locations of preferences files in Photoshop CS4

Reference that here: http://www.adobe.com/go/kb405012

crazy, geeky stuff.

Labels: , ,

Tuesday, February 10, 2009

a Brief History of Photoshop


0.63 Macintosh October 1988

1.0 Macintosh February 1990

2.0 Macintosh June 1991

2.5 Macintosh November 1992

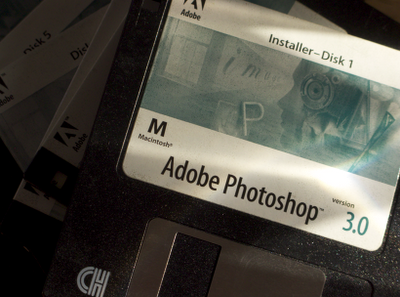
3.0 Macintosh September 1994
(Ted's first Photoshop Experience)

4.0 Macintosh, Windows November 1996
* Adjustment Layers
* Actions (macros)


5.0 Macintosh, Windows May 1998
* Editable type (previously, type was rasterized as soon as it was added)
* Multiple Undo (History Palette)
* Color Management
* Magnetic Lasso


5.5 Macintosh, Windows February 1999
* Bundled with ImageReady
* Save for Web
* Extract


6.0 Macintosh, Windows September 2000
* Vector Shapes
* Updated User Interface
* "Liquify" filter
* Layer styles/Blending Options dialog
(Color Management actually starts working)


7.0 Mac OS 'Classic'/Mac OS X, Windows March 2002
* Made text fully vector
* Healing Brush
* New painting engine


7.0.1 Mac OS 'Classic'/Mac OS X, Windows August 2002
* Camera RAW 1.x (optional plugin)
(Ted's life is changed.)

CS (8.0) Mac OS X, Windows October 2003
* Camera RAW 2.x
* Highly modified "Slice Tool"
* Shadow/Highlight command
* Match Color command
* Lens Blur filter
* Smart Guides
* Real-Time Histogram
* Detection and refusal to print scanned images of various banknotes[2]
* Macrovision copy protection based on Safecast DRM technology
* Scripting support for JavaScript and other languages
* Hierarchical layer groups


CS2 (9.0) Mac OS X, Windows 2000 / XP April 2005
* Camera RAW 3.x
* Smart Objects
(Ted's life changes again...)
* Image Warp
* Spot healing brush
* Red-Eye tool
* Lens Correction filter
* Smart Sharpen
* Smart Guides
* Vanishing Point
* Better memory management on 64-bit PowerPC G5 Macintosh machines running Mac OS X 10.4
* High dynamic range imaging (HDRI) support (32 bit per channel floating point)
* More smudging options, such as "Scattering"
* Modified layer selection, such as ability to select more than one layer.

CS3, CS3 Extended (10.0) Universal Mac OS X, Windows XP SP2 or later April 16, 2007
* Native support for the Intel-based Macintosh platform and improved support for Windows Vista
* Revised user interface
* Feature additions to Adobe Camera RAW
* Quick Select tool
* Alterations to Curves, Vanishing Point, Channel Mixer, Brightness and Contrast, and the Print dialog
* Black-and-white conversion adjustment
* Auto Align and Auto Blend
* Smart (non-destructive) Filters
* Mobile device graphic optimization
* Improvements to cloning and healing
* More complete 32 bit / HDR support (layers, painting, more filters and adjustments)
* Faster launching


CS4, CS4 Extended (11.0) Universal Mac OS X, Windows October 30, 2008
* Smoother panning and zooming and fluid canvas rotation
* OpenGL display acceleration in Photoshop
* Native support for 64-bit on Windows Vista x64
* Adjustments panel
* Auto-blending of images
* Masks panel
* Improved Adobe Photoshop Lightroom workflow
* Content-aware scaling
* Better raw image processing
* Extended depth of field
* Dramatically enhanced color correction
* Auto-alignment of layers
* New file display options (tabbed document display and n-up views)
* New file management and workspaces with Adobe Bridge CS4

Labels: ,

Wednesday, November 26, 2008

Update: Camera RAW 5.2

ok, this is VERY cool stuff.


More than simply adding camera support for new models, we have three nice new features, too. We get, found in the Workflow Options, an output sharpening tool. This is a nice feature that lets you work fast, and process and sharpen files for a particular purpose right in Camera RAW, rather than adding a sharpen step in Photoshop. If you "Save Images" right in Camera RAW, it lets you give it some sharpening before saving. I'm not to clear on exactly how that sharpening is applied...


Second, we have a "Targeted Adjustment Tool". This is sweet. This lets you click and drag a specific tone up or down. Want the shadows lighter? Click the shadows, drag the cursor up.

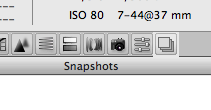
Finally, we get a Snapshots panel, giving us a history of sorts... something that is going to change much of the way we can work in Camera RAW.


There's also a set of additional camera "profiles" I have to look at in the Camera Calibration tab...

I guess plans for my weekend are clear... hours to spend exploring the new stuff, but it really is a great update!

The Adobe page:
Camera Raw 5.2 update
November 25, 2008
Windows | Macintosh

here.

Labels: , ,

Saturday, October 4, 2008

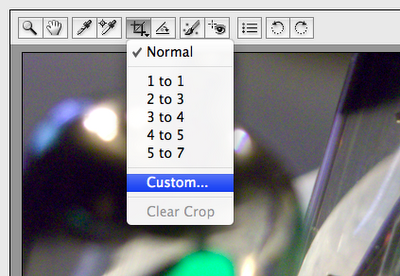
Cropping in Camera RAW


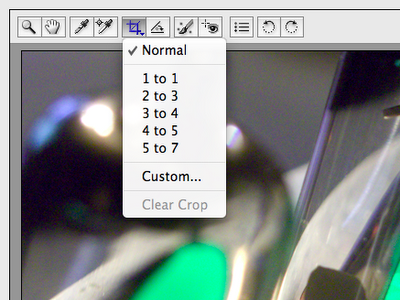
Go to the Crop Tool.

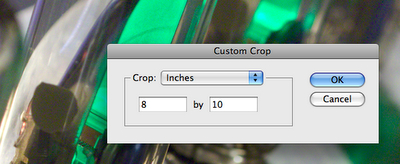
Select "Custom".


Set parameters of croppage.


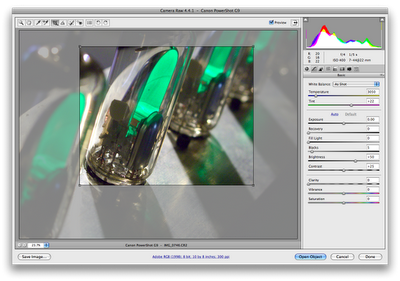
Set crop.


Now, when you process the file you get that crop. The crop gets saved in the RAW metadata, the XMP file. If you re-open and want to change the crop, go right ahead... if you want to clear it, just hit "esc" when you're in the Crop Tool.

Labels: , ,

Sunday, September 28, 2008

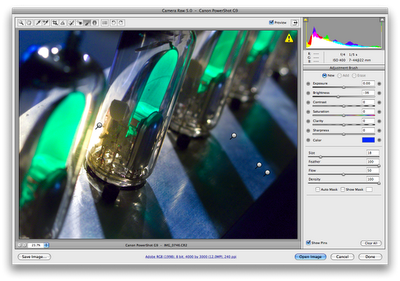
CS4- Camera RAW Adjustment Brush, update


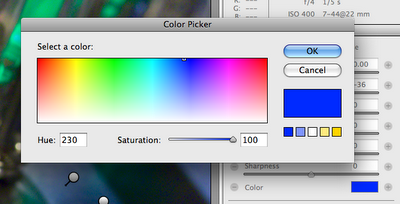
So, I said the color adjustments were limited. They're not.

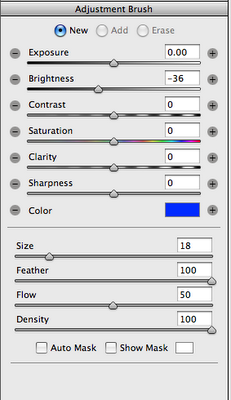
Click on the color patch and you get this. Everything you could ever want.

(Straight out of Lightroom 2, btw, no surprise there.)

Labels: , , ,

Tuesday, September 23, 2008

CS4- Camera RAW Adjustment Brush


Here it is, guys... This is a Brush tool that, in Camera RAW, allows you to selectively apply limited color and fairly decent tone and density corrections.

VERY cool stuff, and exactly what I, for one, was looking for!

Labels: , , ,

Photoshop CS4 new features videos


I got one word.

Camera Raw Adjustment Brush.

well... ok. four words.

Labels: ,

Photoshop CS4

Adobe page here.

...some interesting stuff (but what does it mean?):


  • Smoother panning and zooming and fluid canvas rotation
  • Efficient file management with new Adobe Bridge CS4
  • Tighter integration with Adobe Photoshop Lightroom
  • More powerful printing options
  • Superior performance on very large images
  • Labels: ,

    Sunday, July 27, 2008

    Adobe LiveDocs pages

    This is Adobe's encyclopedia of Photoshop information.

    It's where I go to get the "micro" view of Photoshop details. Sometimes it's incredibly helpful, sometimes not so much. (Example: The "Stack Mode" explanations may make sense to some programmer somewhere, they don't mean crap to me...)

    The search engine is kind of random too. I often just goog what I need and then try to find the "livedocs" reference.

    Labels: , ,

    Saturday, May 10, 2008

    Color Managed printing in Leopard (Epson)

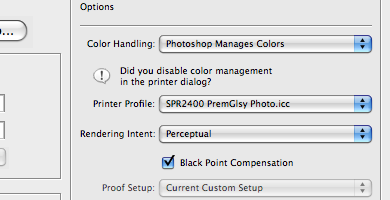
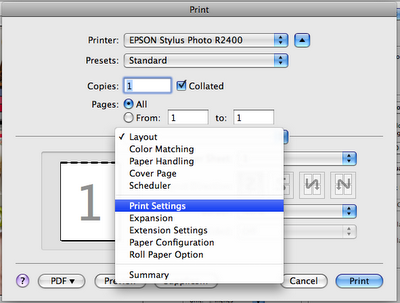
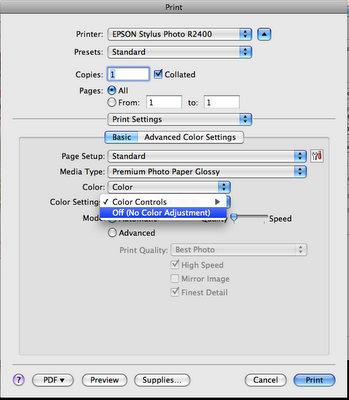
    OK they have changed the Epson printer drivers in Leopard, and combined the "Print Settings" and the "Color Management" windows. For assigning the profile in Photoshop, just select "Color Management" and pick "Off".

    Here is the Photoshop side...


    ...once you hit "Print", you go to the Epson drivers:


    Labels: , , , , ,

    Saturday, May 3, 2008

    GEEKZONE: Masking Layers by the Steps

    Step 1. Prepare the tools
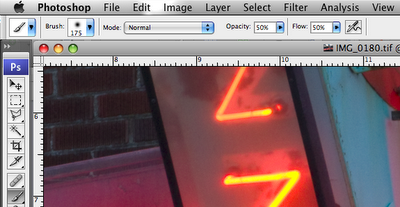
    Brush Settings:
    Mode- Normal, Opacity- 50%, Flow- 50%
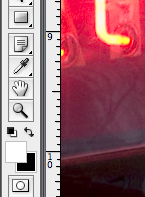
    Foreground/Background color: white/black (default) .
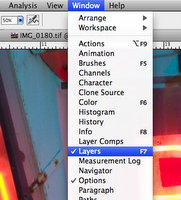
    Layers Palette: visible. (Window>Layers checked)

    Step 2. Create Layer, and Mask.
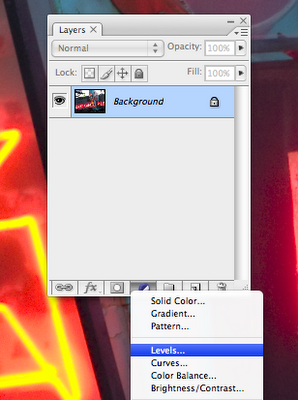
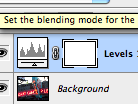
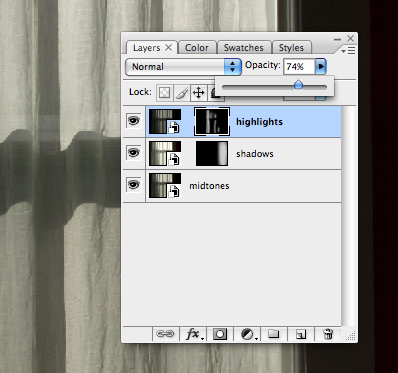
    Select black/white circle (“Create new fill or adjustment layer”). Make adjustment… for example, make the image darker.
    Select Mask (white rectangle next to Adjustment icon.) Turn black with keyboard shortcut Command I.

    Step 3. Make Mask selection.
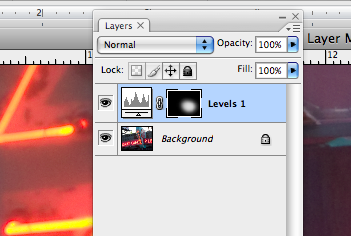
    With the (now black) mask selected, use the Brush tool to “paint” white on the black mask, in areas that you want to become visible, or active. This shows a small area of our adjustment that will “show through”. If the adjustment makes the image darker, this is the only area that will be darker… etc.

    Tips and Tricks.
    “{“ and “}” makes your Brush a smaller and larger diameter.
    Command x switches the foreground/background colors.
    “Painting” black over a white area of the mask “covers” the edit, allowing you to fix and change your selection.
    The “Opacity” button on the Layers palette (different from the “Opacity setting for the Brush Tool) allows you to decrease the overall effect of the Adjustment Layer.


    Labels: , , ,

    Monday, April 7, 2008

    Setting up Your Keyboard Shortcuts


    OK, enough of racing sanders, RVs and Steve Jobs. Time to get back to work.

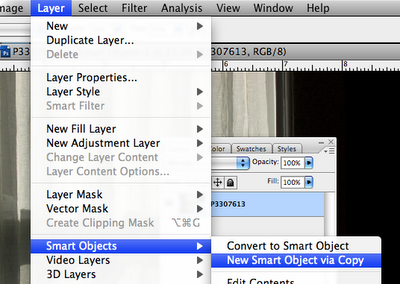
    Making a copy of a Smart Object layer is kind of a pain… the process is to go to Layers, and go Smart Objects>New Smart Object via Copy. (If you just duplicate the Smart Object using the usual “Duplicate Layer”, or by dragging it to the little icon in the Layers Palette, it’s going to make a Smart Object that is linked to the one you copied it from… everything you do to one, will get done to the other.)

    Here is an example of a place that making your own keyboard shortcut can save you a raft of time.

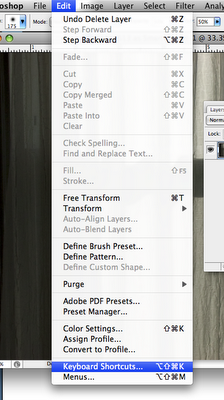
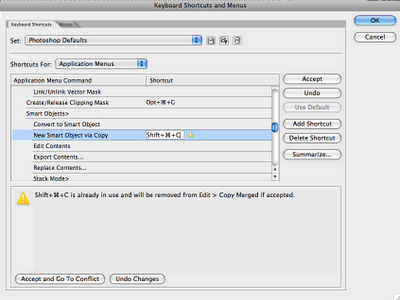
    Go to Edit>Keyboard Shortcuts. Here’s what you’ll see. You want to scroll down to whatever command you want to make a shortcut, or modify a shortcut for, and select it. Then you’ll get a little window that lets you put in your choice. If it conflicts with something that is already set up, as mine does, you’ll get a notice. Since I never “Copy Merged”, I click “OK” and accept the “conflict”.

    Now I just hit Command+Shift+C and snap! New Smart Object layer.

    Labels: , ,

    Sunday, March 30, 2008

    Smart Objects: getting to dynamic range


    Here, I'm using Smart Objects... I've started with three exposures, 2 stops apart.


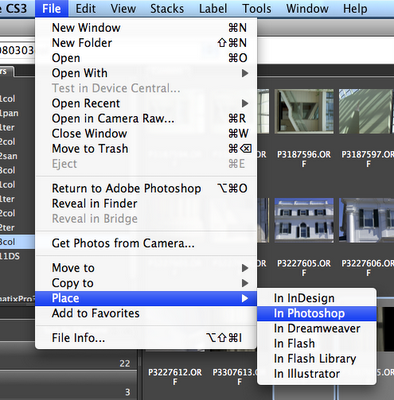
    I open the first one, and "Open Object" (see previous Smart Objects posts for details...) Then I go to Bridge and select one of the brackets, and go to File>Place>Photoshop. This opens that file, as a Smart Object, into the open file in Photoshop. I do it again, and have all three files there as Smart Object Layers.

    Now I can mask them to burn and dodge them... starting off with all the exposure values from my 6-stop exposure bracket range. I have all the control of Layers and Masking, with the ability to go back and edit the RAW source file because of the Smart Object. I can fine-tune the value, the color, the sharpening and the opacity and blending of the Layer, too.

    Labels: , , ,

    Saturday, March 29, 2008

    HDR processing: down the rabbit hole...

    HDR is "high dynamic range", and is a processing method to combine several exposures, of different exposure ranges, to create one file with a gi-normous dynamic range.

    The first place I saw this was with Leaf software, very early on... you could take the RAW files in Leaf Capture, and merge them to one HDR file. This was particularly useful when shooting computer or video displays, or shooting interiors with windows.

    The problems has been, and continues to be, (as far as I have seen), the lack of control in selecting what highlights, and where, are included, and the lack of a re-editing strategy, that is, you can't go back and change anything after you've made the HDR. Imacon, a little later on, allowed you to select several exposures and process them to one file, in layers to work with in Photoshop... a much more practical approach from where I sit. Using masks and layers I could select what and how much of an area or value I wanted to include in a shot.

    Then came the Smart Objects. No surprise there, huh? If I take several exposures and build them into my layers and mask them, I have all the dynamic range I can stand, plus, the so-called "non-destructive editing" workflow. Where all the HDR processors I have seen make one huge file, in ultra-high bit depth, that you can use as a source for all your edits, the Smart Object workflow lets me use the same workflow I'm using for everything else... Smart Objects, Layers, Masks, and build in every bit of detail I want, in just the way I want to...

    Later on I'm going to show what I mean... look for an HDR to Smart Object workflow comparison coming soon.

    Labels: , , , ,

    Friday, March 28, 2008

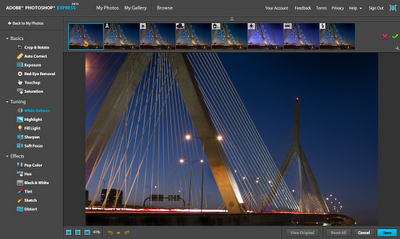
    Adobe Express: bah.


    All I really care about:

    1. Just JPEGS. No RAW, no TIFF, nuthin.
    2. Slower than crap to do anything. And I got me FIOS baybee.
    3. Did you SEE that agreement? The worst thing is, most consumers wouldn't even care. SHAME on you, Adobe.

    On the other hand:

    1. VERY interesting idea of web-based editing program.
    2. A REALLY nice beginners interface. Better than any free thing with any little camera I have seen. Canon and Epson, for example... really good work on that part Adobe.
    3. Great for Grammy, except for the SLOW thing. NOT for ANY pro application I can see.

    This has been fun. Lets get back to work now...

    Labels: , , ,

    Adobe Express Terms of Service: Just Dumb

    The Adobe Terms of Service Agreement:
    "Adobe does not claim ownership of Your Content. However, with respect to Your Content that you submit or make available for inclusion on publicly accessible areas of the Services, you grant Adobe a worldwide, royalty-free, nonexclusive, perpetual, irrevocable, and fully sublicensable license to use, distribute, derive revenue or other remuneration from, reproduce, modify, adapt, publish, translate, publicly perform and publicly display such Content (in whole or in part) and to incorporate such Content into other Materials or works in any format or medium now known or later developed."

    Their response to complaints on the forum:
    "Statement for Terms of Service Issues:
    We've heard your concerns about the terms of service for Photoshop Express beta. We reviewed the terms in context of your comments - and we agree that it currently implies things we would never do with the content. Therefore, our legal team is making it a priority to post revised terms that are more appropriate for Photoshop Express users. We will alert you once we have posted new terms.

    "Thank you for your feedback on Photoshop Express beta and we appreciate your input.

    -Adobe Photoshop Express Team"

    Labels: , , ,

    Thursday, March 27, 2008

    Adobe Express (beta): web-based photo editing application

    The Adobe Express page.
    ...there's a test drive button at the bottom, no membership required. (You do need the latest Flash player for the site to work, at least with Firefox, though... v9 I think.)

    The Photoshop Express Help (and info) page here.


    Who knows... the shape of things to come?

    Labels: , , ,

    Sunday, March 23, 2008

    Smart Objects and RAW files

    Very briefly, a Smart Object is a sweet new device that allows you to get back to all the original qualities of the original file. You can use it for all sorts of files, but we are going to use it for RAW files.

    It’s really pretty simple. The Smart Object sits as a Layer in your image. You get to it by double clicking the icon, and it re-opens the Layer as the RAW file it was originally. Here’s how to do it.


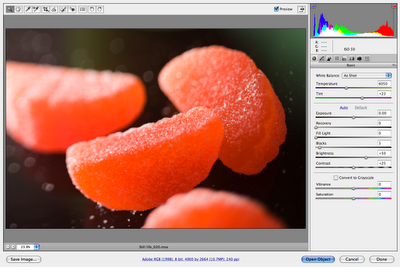
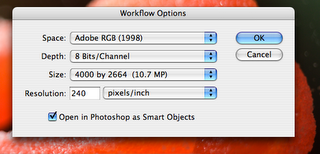
    Open a RAW file. When Photoshop opens it, it will open the Camera RAW dialog. At the very bottom of the Preview window you’ll see what looks like a webpage link… that is the button to your workflow options. Click it.

    There you will see the box “Open in Photoshop as Smart Objects”. Check it.


    Now, when you hit OK and go back to the Camera RAW screen you’ll note that the “Open Image” is now saying “Open Object”. Hit “Open Object”.

    You will be transported to Photoshop’s main screen, where, with your Layers palett open, you’ll see your image with this cute little icon. Double-click that icon, and you are right back to Camera RAW and your RAW adjustments.
    How cool is that?


    The Smart Object workflow is actually a huge subject. Basically, they are Layers and you can do anything to them that you can do to any other adjustment or image layer. My book on it is due out shortly following this one… Yes, a book on Smart Objects. For now, though, I give a more detailed explanation and examples of workflows in my book “Raw Pipeline”.

    Labels: , , ,

    Saturday, March 15, 2008

    Understanding How Rendering Intents Work

    (...an excerpt from the coming book, "Color Pipeline", coming this Fall)

    Rendering Intents are, essentially, the logic used in remapping color into a smaller color space. The two basic rendering intents that we are dealing with are Perceptual and Relative Colorimetric.

    Perceptual intent presumes that you want to keep the relationships between all the colors, that is, if you have colors that appear different, we want to keep that appearance when they are remapped. Converting colors with Perceptual Intent requires that we move all the colors in the space around a bit. I like to make an analogy to a sponge, or a balloon. Perceptual intent kind of squishes the sponge up, and the entire sponge changes shape a little.

    Relative Colorimetric intent is more of a cookie-cutter effect. If colors are outside of the smaller space they are moved to the closest color inside the space. All the colors inside the space remain untouched. If, in the conversion, the colors being remapped lose their relationship to each other, that is, lose their “spacing”, well, so be it.

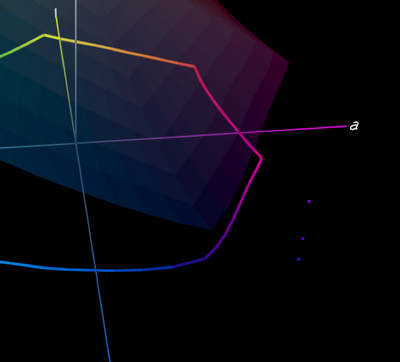
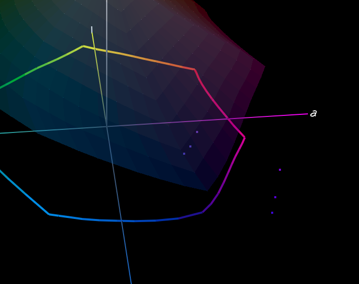
    Here are some examples. I went back to our color burple, and made a couple of other colors… blue, burple and purple. Here they are, sitting well outside the Epson Premuim Luster color gamut (shown very lightly shaded).
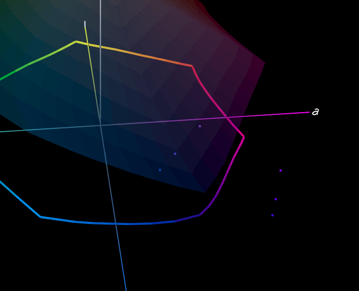
    The next illustration shows the three colors mapped into the gamut of Premium Luster using Perceptual Intent. You can see that the distances between the three are almost exactly the same, and they’ve been moved around a little. This is to maintain our perception of them, and their relationship to each other.

    The final illustration shows the same colors mapped in using Relative Colorimetric Intent. As you can see, they are closer together, they are mapped directly into the gamut just to the nearest available color, with little concern for maintaining any relationship between them.

    So when do you use which one? Keep in mind that with Perceptual Intent everything gets changed… Relative Colorimetric, only the colors that need to change get changed. There’s your answer.

    You use Perceptual Intent when you need to make some big changes in your gamut, and the “look” of the colors is important. For example, if you have a full, rich blue and purple image and you are printing it to Premium Luster you may want to use Perceptual Intent so that the colors will print with the same differences and “spacing” you’re seeing in AdobeRGB, but get mapped into the colors that the printer can work with.

    Relative Colorimetric Intent is really handy when, for the most part, all of your colors are inside the printer gamut, and only a few, like our burple, aren’t playing nice. We don’t need to push everything around just to get burple in there, we just need to push it in, and leave everything pretty much as it sits.

    This is a great case of, if you know where your colors fall, and you know what your gamut is, you can make the best choice about how the system is going to convert the colors and keep as much of the image intact.

    Labels: , , , ,

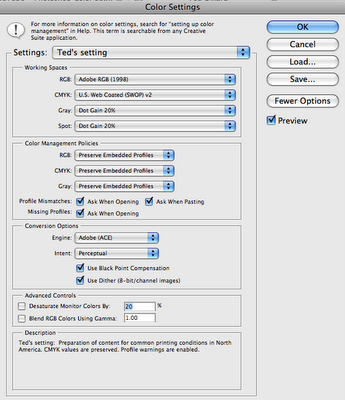
    Color Settings in Photoshop


    Here's how to set up your color settings in Photoshop. This is what you want to end up with... Here's how to get there.

    (Don't worry, there's nothing wrong. There's no sound.)


    Labels: ,