Sunday, August 24, 2008

Smart Objects Gone WILD


Here's a peek at the inner workings of my tortured soul.

I've been throwing ideas around for cover shots for the Smart Object Pipeline, and shot a few dozen images of this lightbulb. This image is the result of 4 files layered as Smart Objects. I think the final file is in the neighborhood of 300MB (so far...). ...and how about THEM apples, for dynamic range? (Take THAT, Mr. "HDR".)

Labels: , , ,

Friday, July 11, 2008

Layers and Blending Modes

The Blending mode is something I use pretty much not at all, but, should you want to head down that particular rabbit hole, again, I would refer to Photoshop Restoration & Retouching by Katrin Eismann and other resources. This, however, is an ever-so-brief explanation, and a list of blending modes and what they do.

Basically, the blending mode tells Photoshop how to blend one layer’s pixels with the pixels below that layer. Different blending modes give you different effects.

“Pass Through”, the default Blending Mode for layer Groups, basically gives you the result that anything you do inside that group, (like adjustment layers), gets applied to all the other layers and groups. For our purposes of making versions, that’s not a great strategy. If we chose “Normal”, then that keeps our adjustments and effects restricted to that Group alone.


Here, for the sake of thoroughness and courtesy of Adobe, is a complete list of Blending Modes and what they do:

List of blending modes

(Choose from the Mode pop‑up menu in the options bar.)
Note: Only the Normal, Dissolve, Darken, Multiply, Lighten, Linear Dodge (Add), Difference, Hue, Saturation, Color, Luminosity, Lighter Color, and Darker Color blending modes are available for 32‑bit images.

Normal
Edits or paints each pixel to make it the result color. This is the default mode. (Normal mode is called Threshold when you’re working with a bitmapped or indexed-color image.)

Dissolve
Edits or paints each pixel to make it the result color. However, the result color is a random replacement of the pixels with the base color or the blend color, depending on the opacity at any pixel location.

Behind
Edits or paints only on the transparent part of a layer. This mode works only in layers with Lock Transparency deselected and is analogous to painting on the back of transparent areas on a sheet of acetate.

Clear
Edits or paints each pixel and makes it transparent. This mode is available for the Shape tools (when fill region is selected), Paint Bucket tool , Brush tool , Pencil tool , Fill command, and Stroke command. You must be in a layer with Lock Transparency deselected to use this mode.

Darken
Looks at the color information in each channel and selects the base or blend color—whichever is darker—as the result color. Pixels lighter than the blend color are replaced, and pixels darker than the blend color do not change.

Multiply
Looks at the color information in each channel and multiplies the base color by the blend color. The result color is always a darker color. Multiplying any color with black produces black. Multiplying any color with white leaves the color unchanged. When you’re painting with a color other than black or white, successive strokes with a painting tool produce progressively darker colors. The effect is similar to drawing on the image with multiple marking pens.

Color Burn
Looks at the color information in each channel and darkens the base color to reflect the blend color by increasing the contrast. Blending with white produces no change.

Linear Burn
Looks at the color information in each channel and darkens the base color to reflect the blend color by decreasing the brightness. Blending with white produces no change.

Lighten
Looks at the color information in each channel and selects the base or blend color—whichever is lighter—as the result color. Pixels darker than the blend color are replaced, and pixels lighter than the blend color do not change.

Screen
Looks at each channel’s color information and multiplies the inverse of the blend and base colors. The result color is always a lighter color. Screening with black leaves the color unchanged. Screening with white produces white. The effect is similar to projecting multiple photographic slides on top of each other.

Color Dodge
Looks at the color information in each channel and brightens the base color to reflect the blend color by decreasing the contrast. Blending with black produces no change.

Linear Dodge (Add)
Looks at the color information in each channel and brightens the base color to reflect the blend color by increasing the brightness. Blending with black produces no change.

Overlay
Multiplies or screens the colors, depending on the base color. Patterns or colors overlay the existing pixels while preserving the highlights and shadows of the base color. The base color is not replaced, but mixed with the blend color to reflect the lightness or darkness of the original color.

Soft Light
Darkens or lightens the colors, depending on the blend color. The effect is similar to shining a diffused spotlight on the image. If the blend color (light source) is lighter than 50% gray, the image is lightened as if it were dodged. If the blend color is darker than 50% gray, the image is darkened as if it were burned in. Painting with pure black or white produces a distinctly darker or lighter area, but does not result in pure black or white.

Hard Light
Multiplies or screens the colors, depending on the blend color. The effect is similar to shining a harsh spotlight on the image. If the blend color (light source) is lighter than 50% gray, the image is lightened, as if it were screened. This is useful for adding highlights to an image. If the blend color is darker than 50% gray, the image is darkened, as if it were multiplied. This is useful for adding shadows to an image. Painting with pure black or white results in pure black or white.

Vivid Light
Burns or dodges the colors by increasing or decreasing the contrast, depending on the blend color. If the blend color (light source) is lighter than 50% gray, the image is lightened by decreasing the contrast. If the blend color is darker than 50% gray, the image is darkened by increasing the contrast.

Linear Light
Burns or dodges the colors by decreasing or increasing the brightness, depending on the blend color. If the blend color (light source) is lighter than 50% gray, the image is lightened by increasing the brightness. If the blend color is darker than 50% gray, the image is darkened by decreasing the brightness.

Pin Light
Replaces the colors, depending on the blend color. If the blend color (light source) is lighter than 50% gray, pixels darker than the blend color are replaced, and pixels lighter than the blend color do not change. If the blend color is darker than 50% gray, pixels lighter than the blend color are replaced, and pixels darker than the blend color do not change. This is useful for adding special effects to an image.

Hard Mix
Adds the red, green and blue channel values of the blend color to the RGB values of the base color. If the resulting sum for a channel is 255 or greater, it receives a value of 255; if less than 255, a value of 0. Therefore, all blended pixels have red, green, and blue channel values of either 0 or 255. This changes all pixels to primary colors: red, green, blue, cyan, yellow, magenta, white, or black.

Difference
Looks at the color information in each channel and subtracts either the blend color from the base color or the base color from the blend color, depending on which has the greater brightness value. Blending with white inverts the base color values; blending with black produces no change.

Exclusion
Creates an effect similar to but lower in contrast than the Difference mode. Blending with white inverts the base color values. Blending with black produces no change.

Hue
Creates a result color with the luminance and saturation of the base color and the hue of the blend color.
Saturation
Creates a result color with the luminance and hue of the base color and the saturation of the blend color. Painting with this mode in an area with no (0) saturation (gray) causes no change.

Color
Creates a result color with the luminance of the base color and the hue and saturation of the blend color. This preserves the gray levels in the image and is useful for coloring monochrome images and for tinting color images.

Luminosity
Creates a result color with the hue and saturation of the base color and the luminance of the blend color. This mode creates the inverse effect of Color mode.

Lighter Color
Compares the total of all channel values for the blend and base color and displays the higher value color. Lighter Color does not produce a third color, which can result from the Lighten blend, because it chooses the highest channel values from both the base and blend color to create the result color.

Darker Color
Compares the total of all channel values for the blend and base color and displays the lower value color. Darker Color does not produce a third color, which can result from the Darken blend, because it chooses the lowest channel values from both the base and the blend color to create the result color.

Labels: ,

Sunday, June 29, 2008

Copying Smart Filter Layers

We’ve seen a few examples where we need to make a filter on another layer, pretty much the same as one we’ve already made. The good news is we can just copy existing Smart Filters in much the same way we copy other things in Layers. But, like in other little features of Smart Objects, there are a few new twists you have to watch out for. Here’s an example.

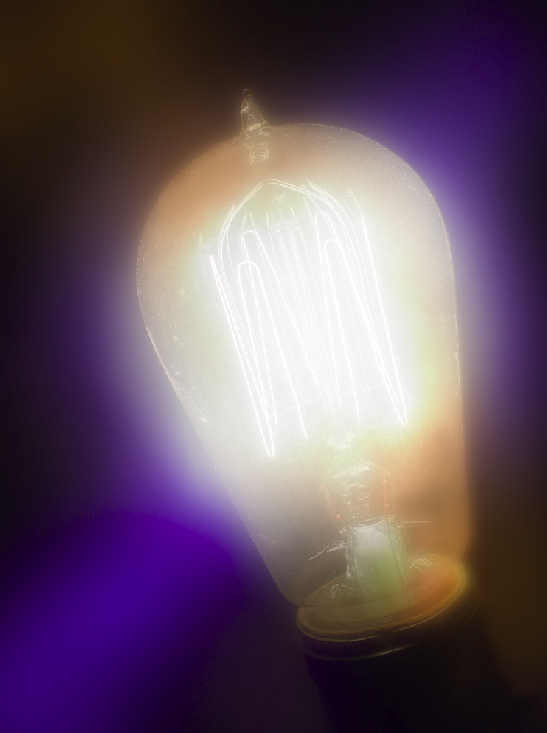
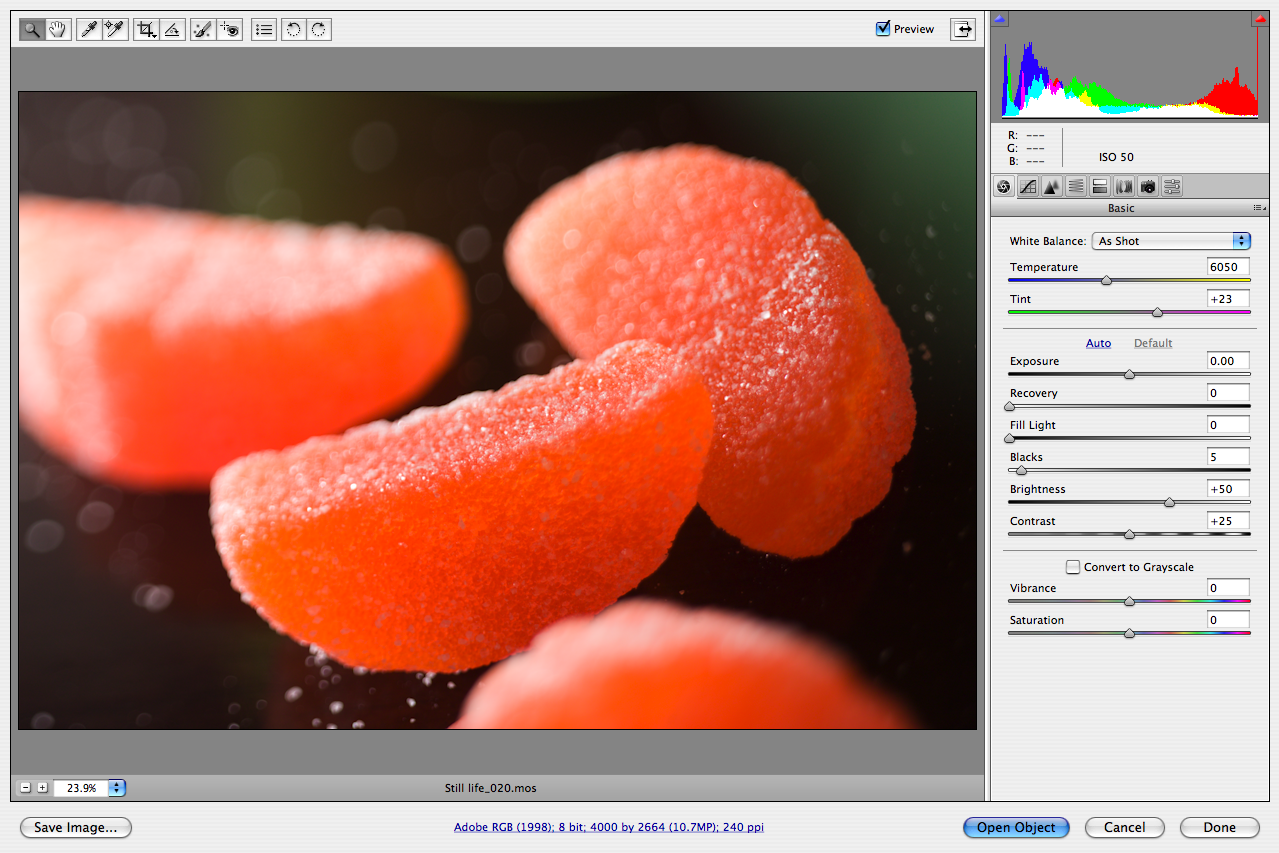
I’m going to open a file, and run through my usual procedure of building my working Smart Object layers.


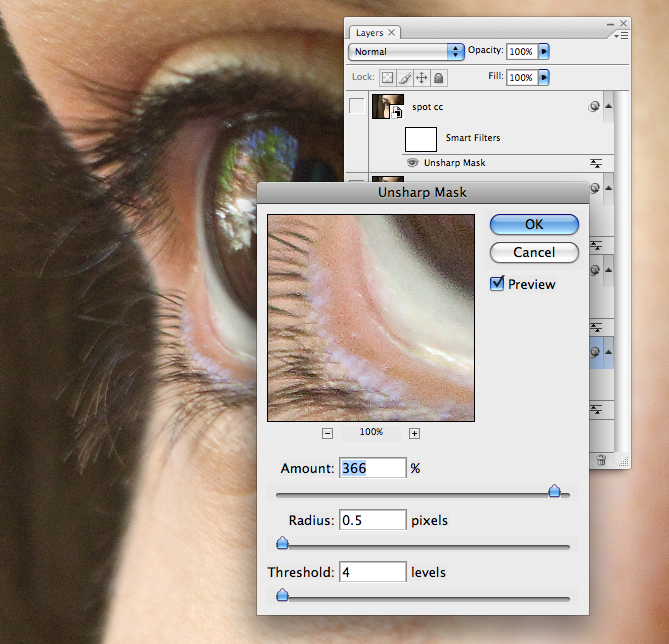
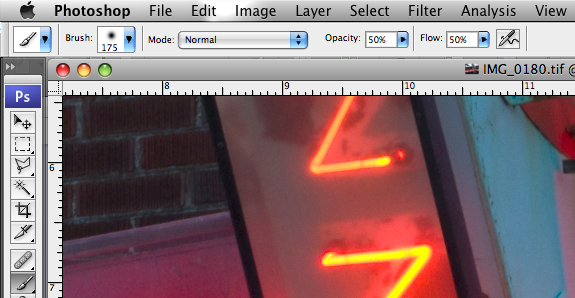
Let’s keep it simple. I’m going to “burn” down the iris, and the eyelashes a bit here, so I’ve gone in and made the adjustment and masked it for just those parts.

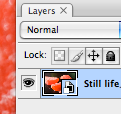
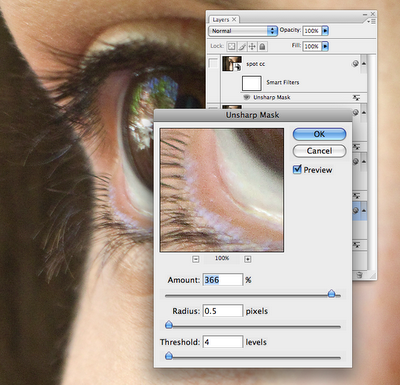
Now I want to get it ready to print, so I size it and do my Unsharp Masking adjustments remembering to turn the images above the “source” image off.


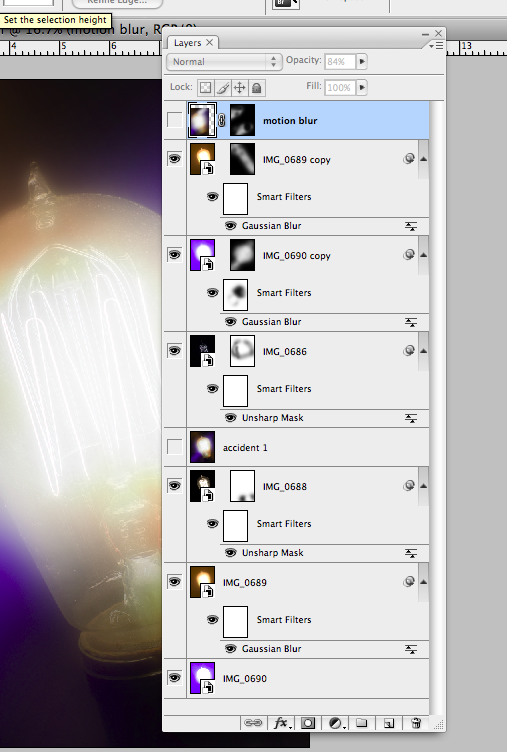
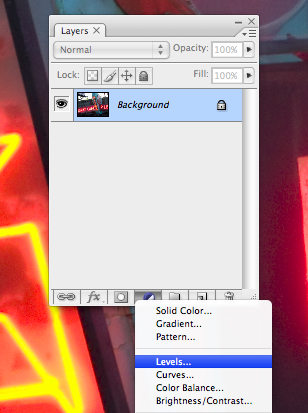
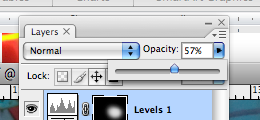
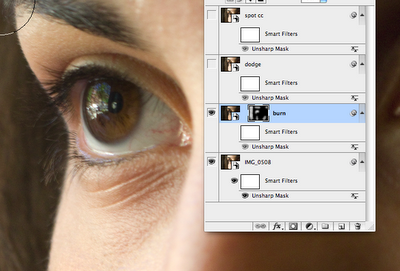
Next, I have my problem. There are some areas of the Smart Filter I made that are going to get covered up by the “burn” layer above it. The "burn" layer isn't going to get sharpened by the layer below it, so I need to make another Unsharp Masking layer, probably just like the one I just did, to plug into that "burn" layer. Here’s how I can do it. This is what I’m starting with- a “burn” layer with the Unsharp Mask Smart Filter turned off (the “eye” on the Unsharp Mask is clicked, to de-activate it, thus not showing the “eye” anymore.)


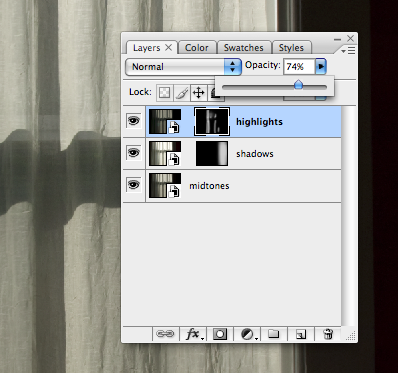
Go back to the “source” layer and click on the Unsharp Mask Smart Filter. Hold down “Option”, click that baby and drag it to the “burn” layer, and drop it right on he (de-activated) Smart Filter. Snap! You’ve added a copied Smart Filter layer, exactly the same, from your “source” layer.


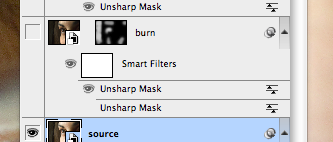
Note that there are two “Unsharp Mask” layers, and one is de-activated (no “eye”). You can actually go ahead and delete that to keep things neat if you want.

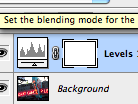
One important, really small detail. Make sure, when you start, the thing you’ve turned off (in your target layer) is the filter itself, NOT the thing that says “Smart Filters”. Look again at the figure. The “eye” is there, next to the “Smart Filters”, but not next to the Unsharp Mask. This will help keep things straight, because it adds a new filter that has the eye, and shows the old one that is turned off. (If you turn off the “eye” next to the Smart Filters thing, then it will add the filter, but activate ALL the layers. Just a bit confusing.)

The only thing left to do is to go back and check your sharpening levels. Remember the Rosenholtz-Sanchez effect! You’ve applied the same filter twice, on two layers, so the effect will be compounded. You can quickly check it simply by toggling the new filter on and off, and see if it’s objectionable, or, you can go in and re-open that filter and give it a poke. (If it’s a problem, Rosenholtz and I have pretty much decided it’s Sanchez’s fault. But that’s another story.)

Labels: , , ,

Saturday, May 3, 2008

GEEKZONE: Masking Layers by the Steps

Step 1. Prepare the tools
Brush Settings:
Mode- Normal, Opacity- 50%, Flow- 50%
Foreground/Background color: white/black (default) .
Layers Palette: visible. (Window>Layers checked)

Step 2. Create Layer, and Mask.
Select black/white circle (“Create new fill or adjustment layer”). Make adjustment… for example, make the image darker.
Select Mask (white rectangle next to Adjustment icon.) Turn black with keyboard shortcut Command I.

Step 3. Make Mask selection.
With the (now black) mask selected, use the Brush tool to “paint” white on the black mask, in areas that you want to become visible, or active. This shows a small area of our adjustment that will “show through”. If the adjustment makes the image darker, this is the only area that will be darker… etc.

Tips and Tricks.
“{“ and “}” makes your Brush a smaller and larger diameter.
Command x switches the foreground/background colors.
“Painting” black over a white area of the mask “covers” the edit, allowing you to fix and change your selection.
The “Opacity” button on the Layers palette (different from the “Opacity setting for the Brush Tool) allows you to decrease the overall effect of the Adjustment Layer.


Labels: , , ,

Sunday, March 30, 2008

Smart Objects: getting to dynamic range


Here, I'm using Smart Objects... I've started with three exposures, 2 stops apart.


I open the first one, and "Open Object" (see previous Smart Objects posts for details...) Then I go to Bridge and select one of the brackets, and go to File>Place>Photoshop. This opens that file, as a Smart Object, into the open file in Photoshop. I do it again, and have all three files there as Smart Object Layers.

Now I can mask them to burn and dodge them... starting off with all the exposure values from my 6-stop exposure bracket range. I have all the control of Layers and Masking, with the ability to go back and edit the RAW source file because of the Smart Object. I can fine-tune the value, the color, the sharpening and the opacity and blending of the Layer, too.

Labels: , , ,

Saturday, March 29, 2008

HDR processing: down the rabbit hole...

HDR is "high dynamic range", and is a processing method to combine several exposures, of different exposure ranges, to create one file with a gi-normous dynamic range.

The first place I saw this was with Leaf software, very early on... you could take the RAW files in Leaf Capture, and merge them to one HDR file. This was particularly useful when shooting computer or video displays, or shooting interiors with windows.

The problems has been, and continues to be, (as far as I have seen), the lack of control in selecting what highlights, and where, are included, and the lack of a re-editing strategy, that is, you can't go back and change anything after you've made the HDR. Imacon, a little later on, allowed you to select several exposures and process them to one file, in layers to work with in Photoshop... a much more practical approach from where I sit. Using masks and layers I could select what and how much of an area or value I wanted to include in a shot.

Then came the Smart Objects. No surprise there, huh? If I take several exposures and build them into my layers and mask them, I have all the dynamic range I can stand, plus, the so-called "non-destructive editing" workflow. Where all the HDR processors I have seen make one huge file, in ultra-high bit depth, that you can use as a source for all your edits, the Smart Object workflow lets me use the same workflow I'm using for everything else... Smart Objects, Layers, Masks, and build in every bit of detail I want, in just the way I want to...

Later on I'm going to show what I mean... look for an HDR to Smart Object workflow comparison coming soon.

Labels: , , , ,

Sunday, March 23, 2008

Smart Objects and RAW files

Very briefly, a Smart Object is a sweet new device that allows you to get back to all the original qualities of the original file. You can use it for all sorts of files, but we are going to use it for RAW files.

It’s really pretty simple. The Smart Object sits as a Layer in your image. You get to it by double clicking the icon, and it re-opens the Layer as the RAW file it was originally. Here’s how to do it.


Open a RAW file. When Photoshop opens it, it will open the Camera RAW dialog. At the very bottom of the Preview window you’ll see what looks like a webpage link… that is the button to your workflow options. Click it.

There you will see the box “Open in Photoshop as Smart Objects”. Check it.


Now, when you hit OK and go back to the Camera RAW screen you’ll note that the “Open Image” is now saying “Open Object”. Hit “Open Object”.

You will be transported to Photoshop’s main screen, where, with your Layers palett open, you’ll see your image with this cute little icon. Double-click that icon, and you are right back to Camera RAW and your RAW adjustments.
How cool is that?


The Smart Object workflow is actually a huge subject. Basically, they are Layers and you can do anything to them that you can do to any other adjustment or image layer. My book on it is due out shortly following this one… Yes, a book on Smart Objects. For now, though, I give a more detailed explanation and examples of workflows in my book “Raw Pipeline”.

Labels: , , ,