Into every Life, a Few JPEGS Must Fall...
Even if this isn’t your first foray into the world of RAW shooting, you are going to run into some JPEGS you have to work with. You may be tempted to stray from the Smart Object process, to go back to your old ways, with either straight adjustments, or adjustment layers. (I can see one of my, well, “favorite” students going “OOOO! OOOO! SEE? It doesn’t work for EVERYthing!”. You know who you are, I’m not printing your name here, I don’t want to encourage you.)
Well, watch this.
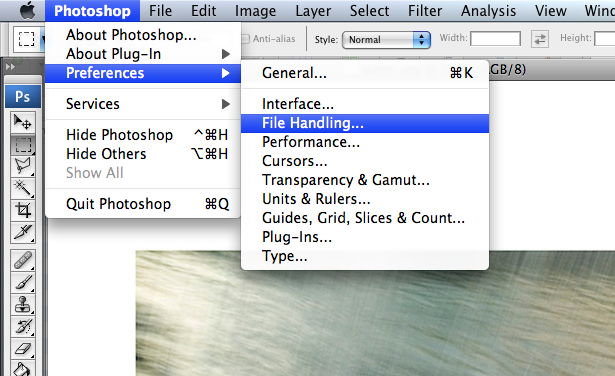
Photoshop>Preferences>File Handling
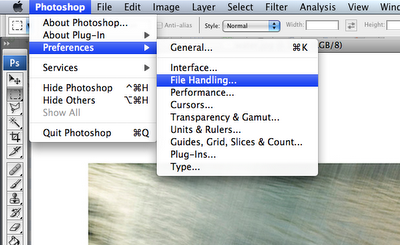
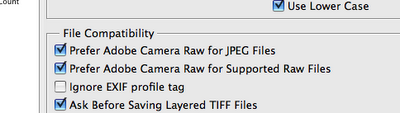
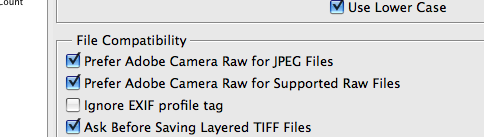
Select “Prefer Adobe Camera RAW for JPEG files”.
Go open a JPEG.
Snap! Now, whenever you open a JPEG, it will open in Camera RAW.
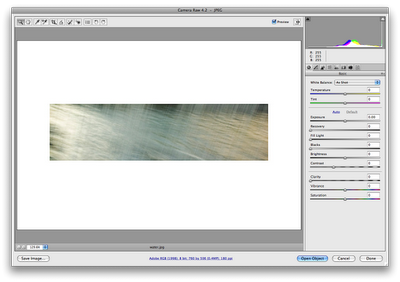
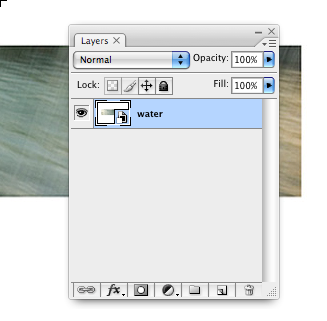
All the usual rules apply. I hit “Open Object” and I got me my happy Smart Object layer. See Seth? (OOPS!)

OK this is a little misleading. You still are working with a JPEG, this is nothing so magical as working on a RAW file, and the JPEG is subject to all the usual restrictions and problems. Anything you do to it, whether through the normal adjustment process or through Camera RAW, is going to be destructive. You’re not going under the hood and working any magical secret sauce here. You’re just working in Camera RAW to apply the adjustments you need, rather than Levels and Curves.
I had a long chat with one of the guys at Adobe about this, and tried to figure out what this meant and why they did it. His answer was that they were just trying to give us an option for working with JPEGs if we liked the “handles”, or controls, of Camera RAW. It standardizes your process, and the Smart Object workflow is a great example that. Not only does everything work just as if it was a RAW file, but I can go back and re-adjust that, just as if it was an adjustment layer, since it’s a Smart Object.
OK, well, it doesn’t work with TIFFs. Or anything else. (sit down, Seth.)
Yet.
Well, watch this.
Photoshop>Preferences>File Handling
Select “Prefer Adobe Camera RAW for JPEG files”.
Go open a JPEG.
Snap! Now, whenever you open a JPEG, it will open in Camera RAW.

All the usual rules apply. I hit “Open Object” and I got me my happy Smart Object layer. See Seth? (OOPS!)
OK this is a little misleading. You still are working with a JPEG, this is nothing so magical as working on a RAW file, and the JPEG is subject to all the usual restrictions and problems. Anything you do to it, whether through the normal adjustment process or through Camera RAW, is going to be destructive. You’re not going under the hood and working any magical secret sauce here. You’re just working in Camera RAW to apply the adjustments you need, rather than Levels and Curves.
I had a long chat with one of the guys at Adobe about this, and tried to figure out what this meant and why they did it. His answer was that they were just trying to give us an option for working with JPEGs if we liked the “handles”, or controls, of Camera RAW. It standardizes your process, and the Smart Object workflow is a great example that. Not only does everything work just as if it was a RAW file, but I can go back and re-adjust that, just as if it was an adjustment layer, since it’s a Smart Object.
OK, well, it doesn’t work with TIFFs. Or anything else. (sit down, Seth.)
Yet.
Labels: jpegs, Smart Objects
posted by Ted Dillard at
5:56 AM
0 Comments
Links to this post
![]()
![]()